
Table of Contents
Table of Contents
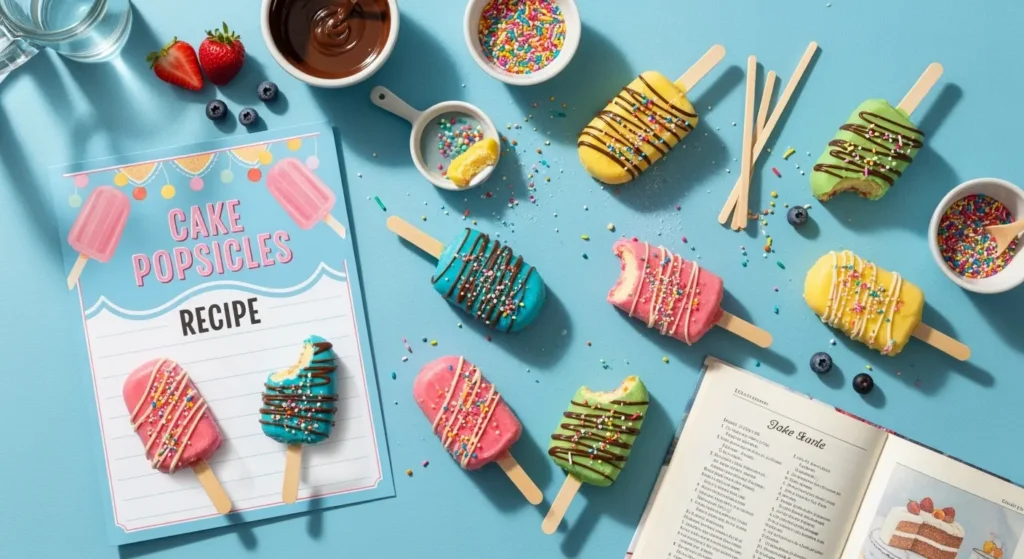
I used to think making fancy desserts was way too complicated for someone like me (I once burned boxed brownies, true story). But cake popsicles recipe? They’re honestly a game-changer. You literally can’t mess them up, and they make you look like a total baking rockstar even if you’re secretly just winging it.
Here’s why I’m obsessed with this cake popsicles recipe: they’re perfect little portions so nobody feels guilty going back for seconds, they’re super fun to make (seriously, it’s like arts and crafts but edible), and they’re the best way I’ve found to use up leftover cake. Plus, they make amazing gifts that actually show you put some thought into it.
I’m gonna walk you through everything – what these magical treats actually are, what stuff you need, my foolproof method that works every single time, fun decorating ideas that’ll blow your mind, and how to fix things when they go sideways (because let’s be real, sometimes they do). More Cake Recipe
Understanding Cake Popsicles Recipe: What Are They?
What’s in a Cakesicle?
So basically, a cakesicle is like if a cake pop and a regular popsicle had a baby. You’ve got three main things going on: crumbled up cake, some frosting to hold it all together, and a chocolate shell that makes everything look fancy and keeps it from falling apart.
The cool thing is, they’re not actually frozen like regular cake popsicles recipe. The chocolate coating does all the work of keeping everything together, while the inside stays soft and cake-y. It’s honestly genius – whoever thought this up deserves a medal.
Cake Pops vs. Cakesicles: The Key Differences
If you’ve ever tried making cake pops, you know the struggle is real. You roll those little balls, stick ’em on sticks, and then try to dip them without everything falling apart or looking like a chocolate disaster. Half the time they crack, and don’t even get me started on the drip marks.
Cakesicles are way smarter. You use these silicone molds and just brush chocolate into them – no scary dipping required! The result? Smooth, shiny treats that look like you actually know what you’re doing. Plus, you can make fun shapes instead of just boring circles. This chocolate cake popsicle recipe method is seriously foolproof.
Gathering Your Ingredients & Essential Equipment
Cake Base Options
Here’s the beauty of cake popsicles – you can literally use whatever cake you want! Got a box mix in your pantry? Perfect. Feeling fancy and want to bake from scratch? Go for it. Have leftover birthday cake sitting in your fridge? Even better! I’ve tried everything from chocolate and vanilla to funfetti (because who doesn’t love sprinkles?), strawberry, spice cake, carrot cake, lemon, coconut, butter pecan, and orange.
Quick hack: if you’re using box mix, swap out some of the oil for applesauce or canned pumpkin. I know it sounds weird, but trust me – it keeps them from getting greasy and adds this amazing moisture. Your cakesicles will thank you later.
Frosting Choices
The frosting is basically the glue that holds everything together, so don’t cheap out here. Regular buttercream is always a safe bet, but cream cheese frosting? That’s where the magic happens. It gives your easy cake popsicles with frosting this almost ice cream cake vibe that’s absolutely incredible.
Just don’t go crazy with the frosting – you want just enough to make the cake stick together, not turn it into a gooey mess.
Best Coating Chocolate
Candy melts are your new best friend. Seriously, I wish someone had told me this sooner. They melt perfectly, don’t require any fancy tempering (because who has time for that?), and they come in every color imaginable. Perfect for those birthday party cake popsicle ideas when you need to match a theme.
If you’re a chocolate snob and insist on the real stuff, you can totally use regular chocolate, but you’ll need to temper it properly or it’ll look all weird and streaky. Or just add a tiny bit of coconut oil to regular melted chocolate – it helps it flow better and prevents cracks, though it won’t be quite as firm.
Essential Equipment
You don’t need a ton of fancy stuff, but there are a few things you absolutely can’t skip: silicone cakesicle molds (and seriously, don’t put these in the oven – learned that one the hard way), popsicle sticks, a clean brush for the chocolate, a small spatula, microwave-safe bowls, and some freezer space.
Step-by-Step: Making Your Perfect Cake Popsicles
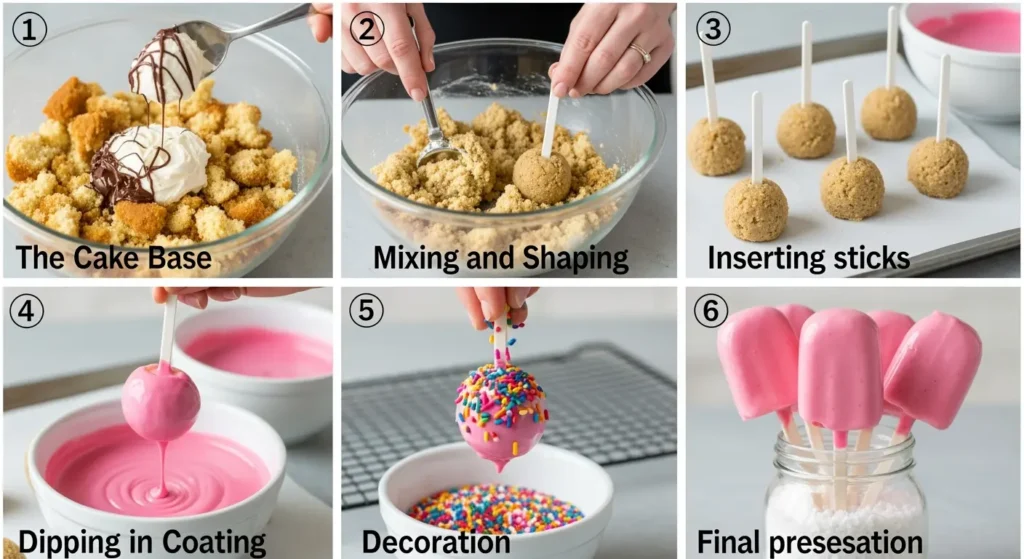
A. Preparing the Cake Dough/Filling
First things first – make sure your cake is completely cool. I know waiting is torture, but warm cake will turn your frosting into soup, and nobody wants that mess. Crumble it up really well with your hands (or use a food processor if you’re feeling fancy), then slowly mix in frosting bit by bit.
You’re looking for that perfect cookie dough consistency – it should stick together when you squeeze it but not be all wet and gross. Once you hit that sweet spot, stick it in the fridge for at least 30 minutes. This step is clutch for making everything easier to work with.
B. Creating the Chocolate Shell (Using Molds)
Time for the fun part! Melt your candy melts on 50% power in the microwave, stirring every 30 seconds because burnt chocolate is the enemy. Brush a thin layer into each mold cavity – think of it like painting, you want nice even coverage.
Here’s a pro tip: stick your popsicle stick halfway into each cavity, then pull it right back out. This creates the perfect little hole for later. Toss the whole thing in the freezer for 10-15 minutes. If you want thicker shells (which I totally recommend), do another coat and freeze again.
C. Filling and Sealing the Cakesicles
Grab that chilled cake mixture and pack it into your chocolate shells like you’re making the world’s tiniest snowballs. Leave a little space at the top – maybe an eighth of an inch or so. Gently push those popsicle sticks into the holes you made earlier, but don’t go crazy and poke through the bottom.
Cover everything with more melted chocolate, smooth it out with your spatula, and back to the freezer for another 20-30 minutes. Then comes the most satisfying part – carefully bending that silicone mold to pop out your beautiful cakesicles. It’s like unwrapping presents!
D. Making Cakesicles Without a Mold (Alternative Method)
Don’t have molds? No problem! Just shape your cake mixture into little rectangles with your hands (it’s messy but fun). Dip your sticks in melted chocolate first – this helps them stick way better. Chill them for a bit, then dip the whole thing in chocolate. Sure, they won’t look quite as perfect, but they’ll taste just as amazing.
Creative Cakesicle Designs & Flavor Variations
This is where you can totally go wild and let your inner artist loose! I love drizzling different colored chocolate in zigzags – it looks so fancy but takes like two seconds. Roll them in sprinkles while the chocolate’s still wet, or press in mini chocolate chips for extra texture.
Seasonal decorating is where things get really fun. Halloween? Orange and black all the way – maybe add some spooky sprinkles. Christmas? Red and green with tiny holly decorations. Easter calls for pastels and spring vibes. Valentine’s Day is perfect for pink and white swirled coatings that look super romantic.
For birthday party cake popsicle ideas, I love matching the party theme. Sports party? Use team colors. Princess party? Break out the edible glitter and pearl dust. Superhero theme? Bold primary colors and maybe some fun comic book-style decorations.
Troubleshooting Common Cakesicle Issues
Let’s talk about when things go wrong (because they will, and that’s totally okay). If your chocolate shells are cracking, it’s probably because something got too warm too fast. Make sure everything’s nice and cold before you start, and don’t rush the temperature changes.
Getting weird condensation or “sweating”? That happens when you move them from cold to warm too quickly. Just let them adjust gradually – patience is key here.
Cakesicles falling off the sticks is usually because you went a little heavy on the frosting or made the chocolate coating too thick. The cake mixture should hold together but not be super wet, and those chocolate layers should be thin but complete.
Storing Your Cakesicles
Here’s the deal with storage: if they’ve been sitting out for more than an hour or two, pop them in the fridge. They’ll stay good for about 3-4 days in there, which is perfect for making them ahead of parties.
Want to make a big batch? Wrap each one individually and freeze them – they’ll keep for like 6 weeks! Just move them to the fridge the night before you want to eat them so they thaw properly without getting all sweaty.
Why Cakesicles are the Perfect Treat for Any Event
I’m telling you, these things are party MVPs. You can customize them for literally any occasion – I’ve made elegant ones for weddings and silly ones for kids’ parties. They’re already the perfect size (no more awkward “how big should this slice be?” moments), and serving them is a breeze since everyone just grabs one and goes.
They also make the best homemade gifts. People always seem so impressed when you hand them a beautifully decorated cakesicle, even though we both know how easy they actually are to make. Shh, that can be our little secret!
And honestly? The mold method makes these so much easier than regular cake pops. I used to avoid making cake pops because I’m terrible at the whole dipping thing, but cakesicles? Even I can make these look professional.
Frequently Asked Questions
What is the average cakesicles price?
Bakeries usually charge $3-8 each (which is honestly highway robbery), but making them at home only costs about 50 cents to $1.50 each. Math win!
How many cake pops does a box of cake make?
You’ll get around 24-30 cakesicles from one box mix, depending on how big your molds are and how much frosting you add.
How to make vegan cakesicles?
Totally doable! Just use vegan cake mix, dairy-free frosting, and check that your chocolate coating is vegan too. Lots of candy melts are accidentally vegan anyway.
Does a cake pop maker work for cakesicles?
Nah, those make round shapes, not popsicle shapes. But you could use it to make the cake balls and then shape them by hand if you really want to.
Should cake pops be cold before dipping?
Definitely! Cold cake mixture is way easier to work with and won’t melt your chocolate coating. Trust me on this one.
What do you dip cakesicles in?
Candy melts are perfect for beginners, but if you want that rich chocolate flavor, go with real chocolate (just remember to temper it or add a little coconut oil). Don’t use regular chocolate chips though – they’re too thick and chunky.
How long can you store cakesicles?
In the fridge, they’re good for 3-4 days. In the freezer, you can keep them for about 6 weeks if they’re wrapped properly.
Conclusion
Look, I’m not gonna lie – the first time I made cakesicles, I was convinced I’d mess them up somehow. But following these steps, they turned out amazing! The best part is how forgiving this cake popsicles recipe is. Even if they’re not Pinterest-perfect, they’re still gonna taste incredible.
Whether you’re going simple with a basic chocolate version or getting fancy with elaborate birthday party cake popsicle ideas, the technique stays the same. Just start easy to build your confidence, then go wild with colors and decorations once you get the hang of it.
So what are you waiting for? Go make some cakesicles and prepare for everyone to think you’re some kind of dessert genius. And hey, when you post those gorgeous photos on Instagram, don’t forget to tell everyone how “surprisingly easy” they were to make (wink wink)!
Reviews
There are no reviews yet. Be the first one to write one.